FE 讀書會(4-8):Redux
Redux
如果照著前面一篇篇操作,應該會記得 React Component 中的 state ,也就是我們直接在 constructor 中初始化的那個東西。
如果 Component 很小,直接使用內部的 state 還沒有問題。隨著 Component / class 越來越大,每個都有自己的 state,然後又互相作用,是不是會越來越不知道自己在寫甚麼東西咧?
這時候就可以用 Redux 來解決這個問題。可把 Redux 想成一個獨立的 state 管理引擎。
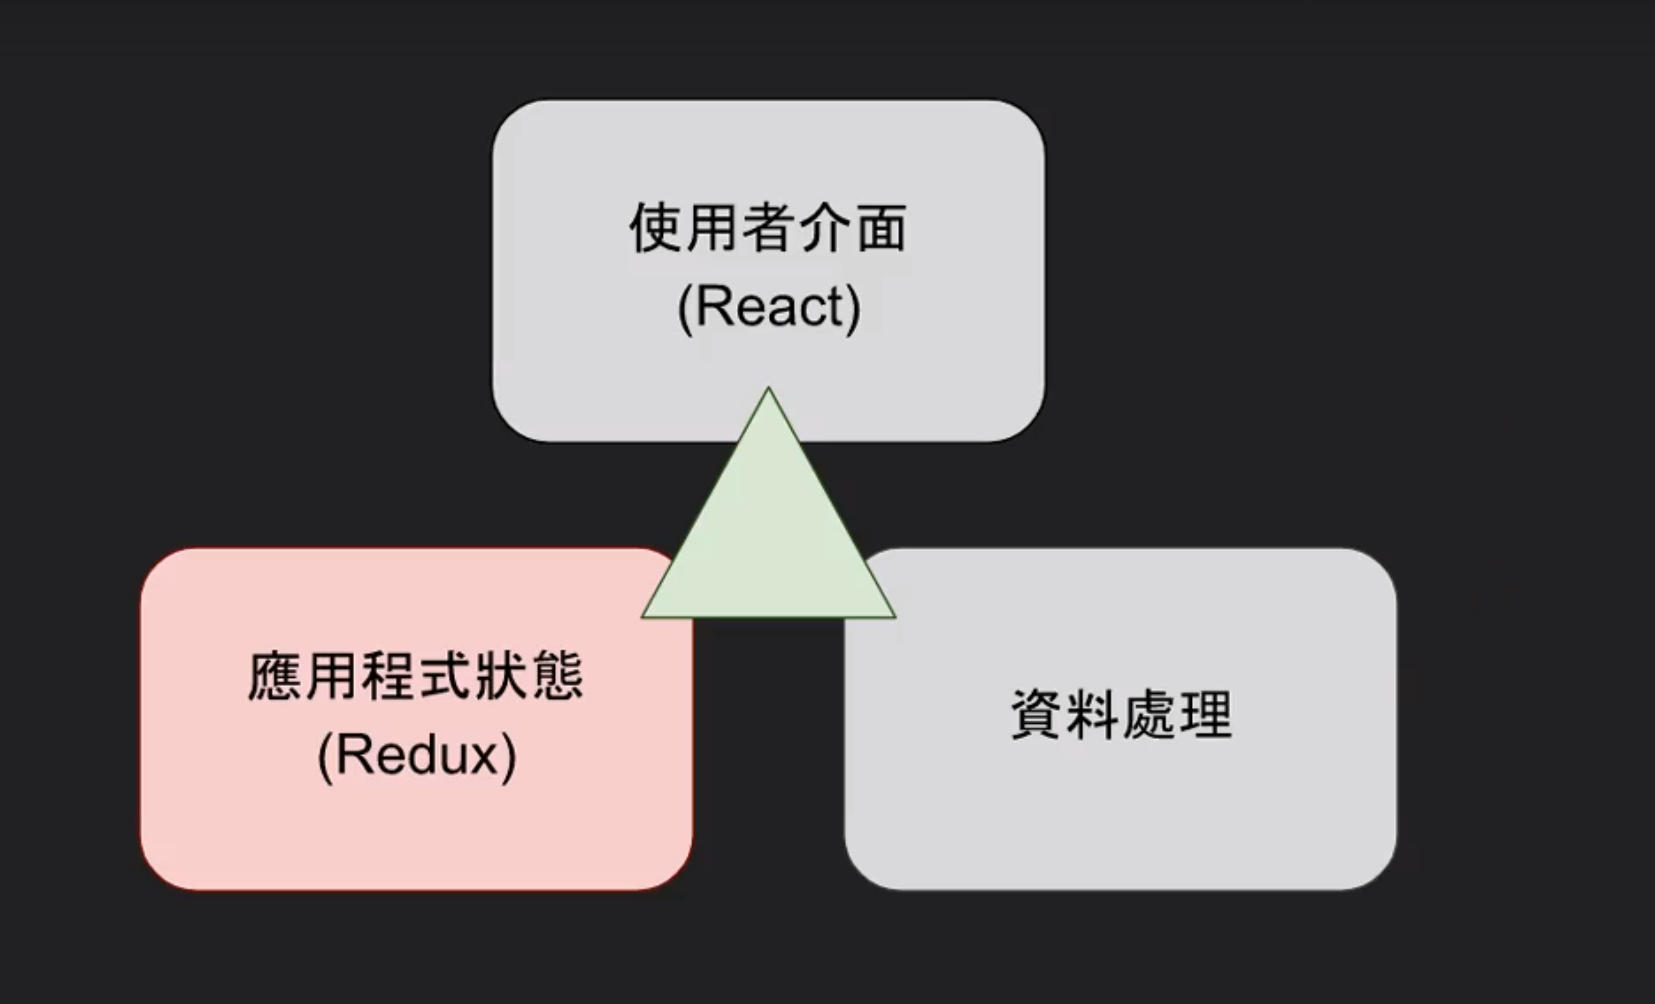
上圖表示了基本的 React 、 Redux 和 資料處理 的三角關係。
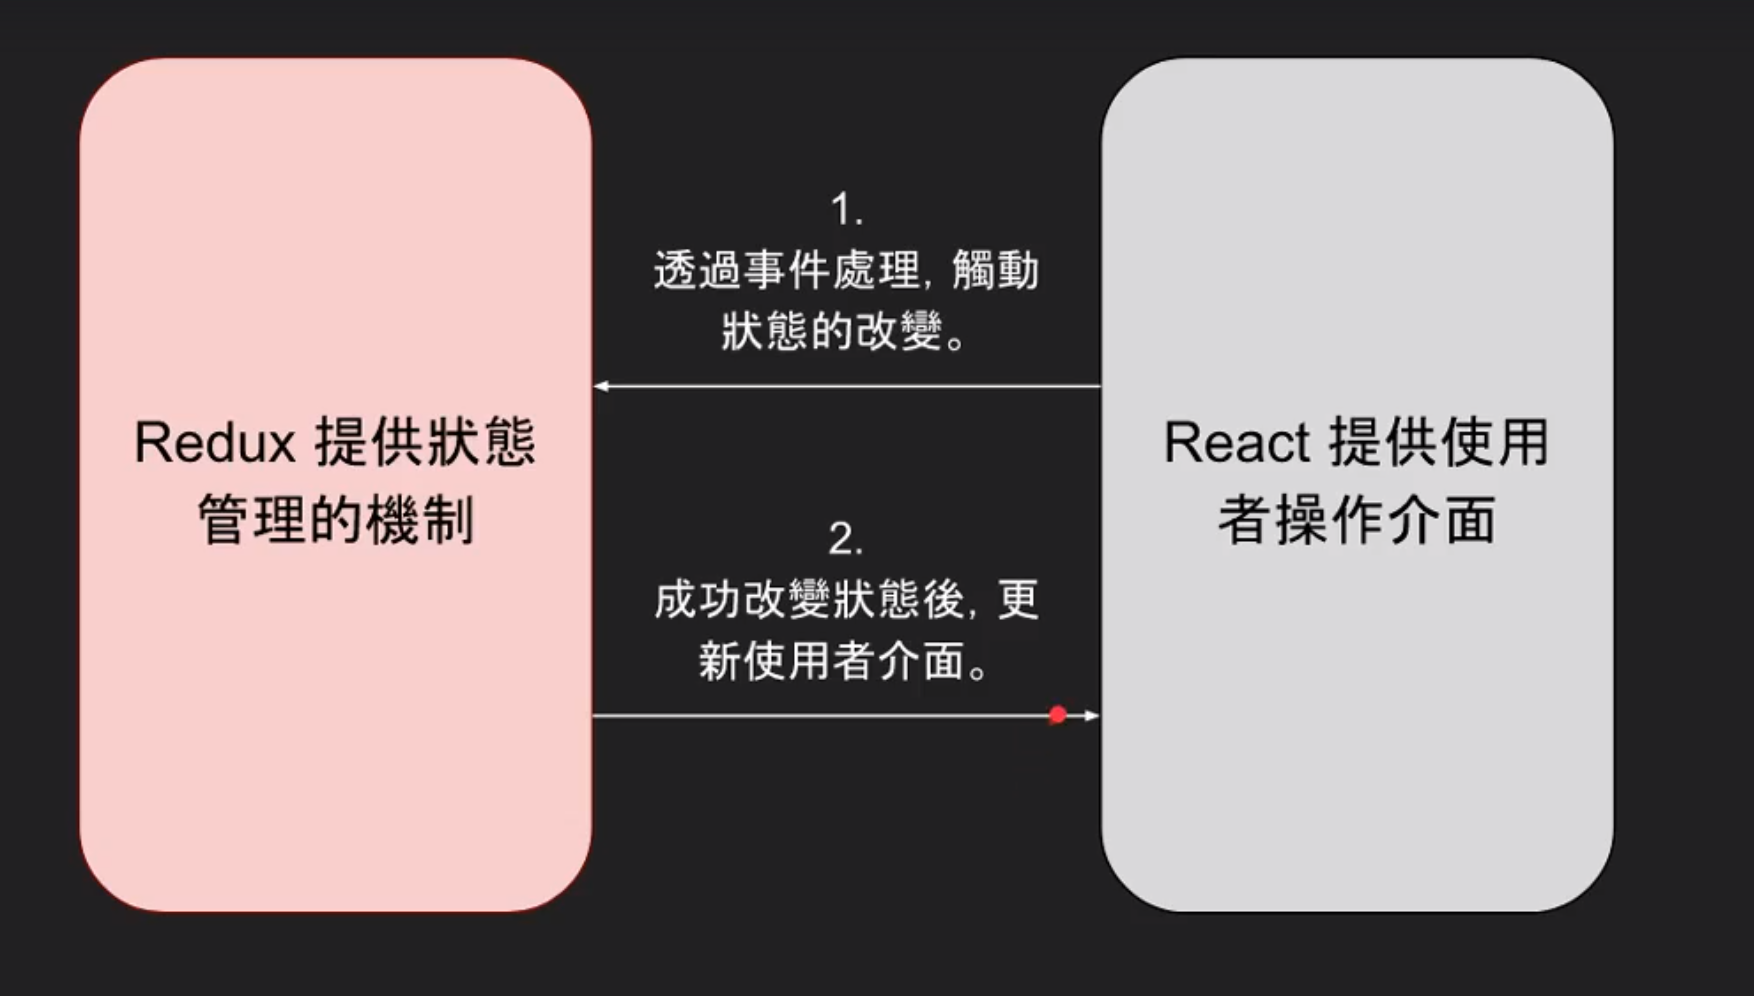
如果只看 React 和 Redux 的話,其實可以用 MVVM 的關係去理解。 React 管理介面 (Presentation)的變化,而 Redux 管理後面的運作以及事件邏輯 (Container)。
詳細文章可以參閱 Redux-搭配React運用
讓我們用一個 Sample 來理解看看吧~
ToggleSwitch - React Only
直接看例子吧
<!DOCTYPE html>
<html>
    <head>
        <meta charset="utf-8"/>
        <title>Switch</title>
        <script crossorigin src="https://unpkg.com/react@16/umd/react.production.min.js"></script>
        <script crossorigin src="https://unpkg.com/react-dom@16/umd/react-dom.production.min.js"></script>
        <script src="https://unpkg.com/babel-standalone@6/babel.min.js"></script>
        <style type="text/css">
            .switch{
                width:60px;height: 30px;background-color: #eeeeee;border-radius:15px;
            }
            .switch>.btn{
                width:30px;height: 30px;background-color: #444444;border-radius:15px;
            }
            .switch-on{
                background-color: #ddffdd;
            }
            .switch-on>.btn{
                background-color: #448844;margin-left: 30px;
            }
        </style>
        <script type="text/babel">
            class Switch extends React.Component{
                constructor(props){
                    super(props);
                    this.state={on:false};
                }
                render(){
                    let className = "switch";
                    if(this.state.on){
                        className+=" switch-on";
                    }
                    return  <div className={className}
                                 onClick={this.toggleButtonClick.bind(this)}>
                                <div className="btn"></div>
                            </div>
                }
                toggleButtonClick(e){
                    this.setState((currentState)=>({on:!currentState.on}));
                    //this.setState({on:!this.state.on});
                }
            }
            window.addEventListener("load", ()=>{
                ReactDOM.render(<Switch/>, document.body);
            })
        </script>
    </head>
</html>
大家都很熟了,這個案例是純粹使用 React 來製作一個 ToggleSwitch。
接下來,會使用 Redux 來改寫這個 Sample 。
ToggleSwitch - React + Redux
先來看 Sample 然後來看看差異在哪裡。
<!DOCTYPE html>
<html>
    <head>
        <meta charset="utf-8"/>
        <title>Switch</title>
        <script crossorigin src="https://unpkg.com/react@16/umd/react.production.min.js"></script>
        <script crossorigin src="https://unpkg.com/react-dom@16/umd/react-dom.production.min.js"></script>
        <script src="https://unpkg.com/[email protected]/dist/redux.min.js"></script>
        <script src="https://unpkg.com/babel-standalone@6/babel.min.js"></script>
        <style type="text/css">
            .switch{
                width:60px;height: 30px;background-color: #eeeeee;border-radius:15px;
            }
            .switch>.btn{
                width:30px;height: 30px;background-color: #444444;border-radius:15px;
            }
            .switch-on{
                background-color: #ddffdd;
            }
            .switch-on>.btn{
                background-color: #448844;margin-left: 30px;
            }
        </style>
        <script type="text/babel">
            class Switch extends React.Component{
                constructor(props){
                    super(props);
                    this.state=store.getState();
                }

                render(){
                    let className = "switch";
                    if(this.state.on){
                        className+=" switch-on";
                    }
                    return  <div className={className}
                                 onClick={this.toggleButtonClick.bind(this)}>
                                <div className="btn"></div>
                            </div>
                }
                toggleButtonClick(e){
                    store.dispatch({type:"UPDATE_SWITCH"});
                }
                refresh(){
                    this.setState(store.getState());
                }
                componentDidMount(){
                    this.unsubscribe=store.subscribe(this.refresh.bind(this));
                }
                componentWillUnmount(){
                    this.unsubscribe();
                }
            }

            let store;
            let reducer=function(state, action){
                switch(action.type){
                    case "UPDATE_SWITCH":
                        return {on: !state.on};
                    default:
                        return state;
                }
            }

            window.addEventListener("load", ()=>{
                store=Redux.createStore(reducer, {on:false});

                ReactDOM.render(<Switch/>, document.body);
            })
        </script>
    </head>
</html>
重點整理如下:
1. 使用 Redux 的 CDN:
<script src="https://unpkg.com/[email protected]/dist/redux.min.js"></script>
*詳情可到 Redux官網 尋找 Installation
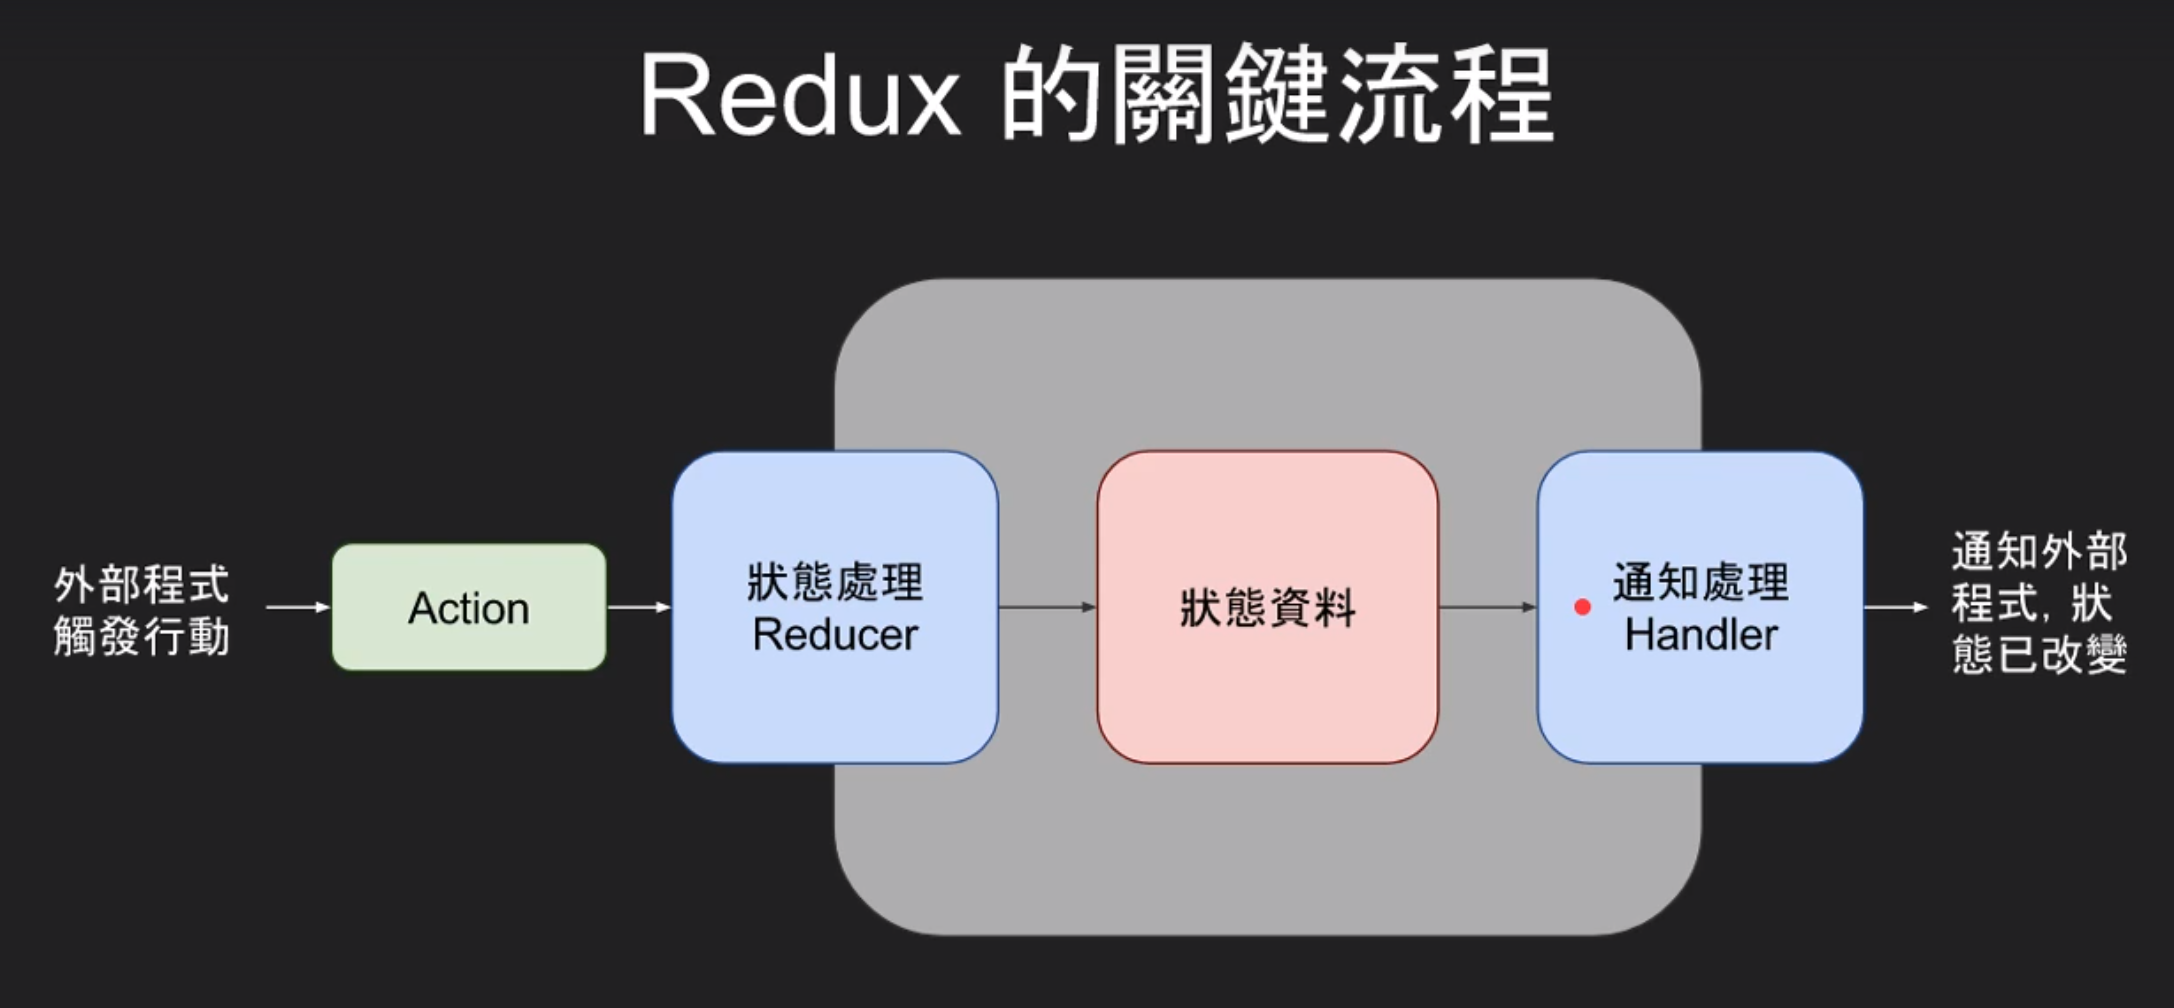
2. Redux 的關鍵流程:
1. 要先初始化 Redux。
    let store;
    let reducer=function(...){
        //先省略不看
    }

    window.addEventListener("load", ()=>{
        //初始化 Redux
        store=Redux.createStore(reducer /* 狀態處理函式 */, {on:false} /*[初始狀態]*/);

        ReactDOM.render(<Switch/>, document.body);
    })
在 Redux.createStore 的時候,我們必須要傳入一個狀態處理函式 - reducer。這個後續再說明。回傳的 store 就是 Redux 的主要實體。
這就是上方的灰色空間。
2. 取得 Redux 內的狀態:
    constructor(props){
        super(props);
        this.state=store.getState();
    }
store.getState 就是取得 Redux store 內最新的狀態資料物件。也就是上方紅色的區塊。
3. 派送 Action 改變狀態
    toggleButtonClick(e){
        store.dispatch({type:"UPDATE_SWITCH"});
    }
ToggleSwitch 點選的時候會觸發 onClick 事件,這時 toggleButtonClick 會使用 store.dispatch(Action) 的函式,也就是流程中的 Action 部分。
每個 Action 物件一定要有一個 type 屬性,代表著這個動作的唯一值。
4. Reducer
    let reducer=function(state, action){
        switch(action.type){
            case "UPDATE_SWITCH":
                return {on: !state.on};
            default:
                return state;
        }
    }
這裡就是初始化時傳入的 reducer 。 reducer 就是一個用來處理狀態的函式。參數有兩個:
state目前狀態。action送出的 Action 物件。
在 reducer 內收到這個物件以及目前的狀態。 reducer 內則利用這兩個來回傳更新後的狀態。
以這個例子來說,點了 ToggleSwitch 後,我們送出一個 {type:"UPDATE_SWITCH"} 的 Action 物件。在 reducer 內,我們判斷 action.type 來決定我們要做的事情。這個例子來說,如果我們收到 action.type 為 UPDATE_SWITCH 的 Action 物件, state 物件的屬性 on 就要改變為原來的相反。如果我們收到其他的 Action 物件,則不做修改,直接回傳目前的狀態。
5. 回應狀態的改變
    refresh(){
        this.setState(store.getState());
    }
    componentDidMount(){
        this.unsubscribe=store.subscribe(this.refresh.bind(this));
    }
這是上圖最右邊的通知處理 Handler。在 reducer 回傳 state 物件後, store 會發出通知給 subscribe 註冊的事件。
在這個例子中,我們在 subscribe 中註冊 refresh 的函式。這個函式的用途就是將 ToggleSwitch 的 Component 透過 setState 改為最新的狀態。
6. 停止回應狀態的改變
    componentDidMount(){
        this.unsubscribe=store.subscribe(this.refresh.bind(this));
    }

    componentWillUnmount(){
        this.unsubscribe();
    }
在這個例子中,我們會在 ToggleSwitch 被釋放,觸發 componentWillUnmount 時,將註冊的 refresh 事件移除。
小結
在這篇文章中,我們利用 ToggleSwitch 的 class 作為範例,引入 Redux 修改整體流程。過程中我們知道了 Redux 的關鍵流程 - 觸發事件後使用 dispatch 派送 Action 物件 (必須要有一個 type 屬性)到 reducer 。利用 reducer 修改狀態物件,並回傳最後的結果到 store.subscribe 的通知處理事件。最後利用 Component 的 lifecycle 註冊以及註銷事件。
Refernece
Author Leefu Chen
LastMod 2018-05-07